
When you leave the nail shop with freshly painted nails, you might feel like a completely different person. Nothing makes you feel like your best self, like a little relaxation and a new manicure. But it can cost much quicker, even more so if you do nail art.
So, we’ve compiled a list of 10 of our favorite basic and easy nail art styles you can do at home. There’s a style here for everyone, whether you want to show off a splash of color along your nails, a tonal gradient across all ten fingers, simple glitter stripes, or a double French manicure. Strong nails are the key to beautiful nail art.
10 Easy DIY Nail Art Ideas for Beginners
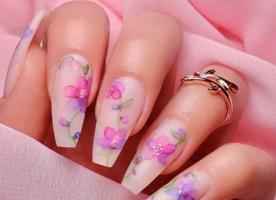
1. Flower
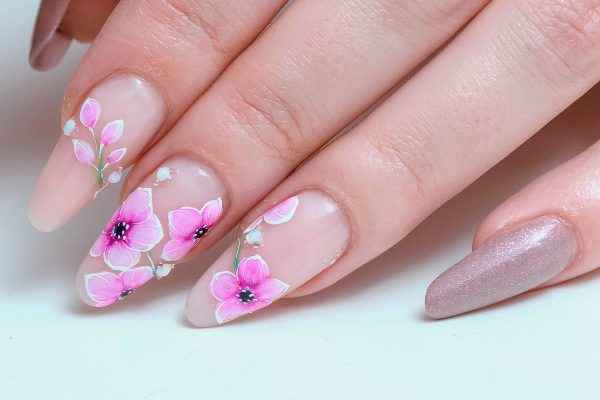
Use a very fine brush or a toothpick to make lovely flower patterns on your nails. You might go for a summery style by selecting bright and vibrant colors, or you can go for a more delicate vibe by sticking to pastels.
2. Ombre

Blending two or more colors to create an ombre effect gives the appearance of a lovely gradient. To create a gradient appearance on your nails, you may use a brush or a sponge to dab the different colors onto your nails.
3. Glitter
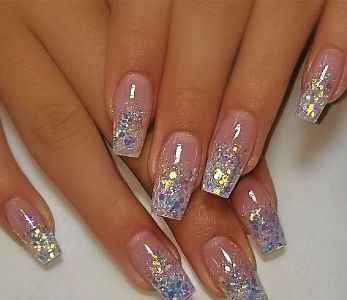
Applying a coat of glitter nail paint can give your nails a sparkling appearance. You can go all out with a manicure completely covered with glitter, or you can use it as an accent on one or two nails.
4. Polka Dots
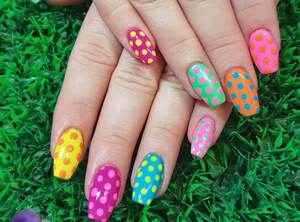
Use a toothpick or dotting tool to make perfect nail polka dots. For a more freewheeling look, use many colors. For a more classic look, use one color.
5. French Manicure

French manicures will never go out of style. Polished-looking white nail polish is popular, but don’t be afraid to experiment with various colors.
6. Animal Print
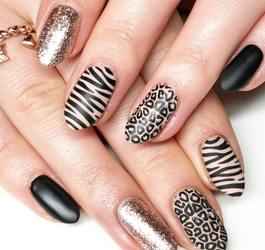
If you have an animal pattern on your nails, you could show off a more wild feeling. Using a stamping tool or a very fine brush, it is easy to make patterns on your fingernails that appear like leopard skin, zebra skin, or snakeskin. These designs may be created on your fingernails.
7. Stripes
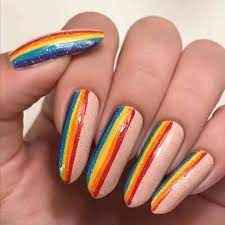
You may get a modern and clean look with your manicures using a striping brush or striping tape. Your manicures will look cleaner and more put together as a result. Experiment with various color combinations to create an impression that is difficult to overlook.
8. Geometric

When it comes to nail art, geometric designs may give you an on-trend and edgy look. Using tape or a striping brush to create stripes on your nails, you may make manicure designs with triangles, diamonds, and other geometric motifs.
9. Watercolour
By applying polish to your nails using a brush, you can get a delicate and ethereal look. Your nails will seem as if they were painted with watercolor. You may get a beautiful combination by using a variety of colors, or you can go for a monochromatic effect by utilizing just one color throughout.
10. Splatter
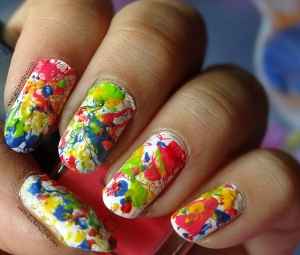
For a fun and messy style, you may spatter nail paint over your nails using a straw. For a more whimsical impression, you may use just one color or numerous colors.
How To Do A Manicure At Home?
Remove Nail Polish From Your Fingernails And Toes
Spend the same time preparing your nails as you polish them to achieve the same level of excellence that a professional manicurist would achieve at home. Even if you don’t have paint on your nails yet, you should still wipe each one with a cotton ball soaked in remover to eliminate any oils or debris that might cause your varnish to get distorted later on. Remember to clean your hands with soap and water when finished thoroughly.
Clip, File, And Buff
If it’s required, start by cutting your nails. Then, carefully file in one direction while moving in a straight line to create either square, round, or somewhere between tips. Buffing your nails is similar to brushing your teeth in that it removes ridges, makes your nails seem younger, and brightens the overall appearance of the nail plate.
Pull Your Cuticles Back Into Place
Cuticles are prepared using cuticle remover to soften the region and help dissolve dead skin. Ensure that the remover is not an oil or a balm.
Scrub Your Hands To Remove Dead Skin
Scrub away dead skin cells and restore moisture to your hands, wrists, and forearms with an exfoliating product containing both ingredients. After that, be sure to wash your hands and properly dry them.
Make Sure That Your Hands And Cuticles Are Well-Moisturized
Apply some moisturizer to keep your nearly dry nail polish from smudging later. Even if you’re not at a spa, you should spend a few minutes relaxing and unwinding by giving yourself a quick hand massage. To complete the look, remove any leftover polish residue from each nail by wiping it with a nail polish remover.
Apply a Base Coat
Applying a base coat helps to moisturize, protect, and prevent chipping of the nails. After that, take a break for a few minutes.
Paint Your First Coat Of Colour Onto The Surface.
Now we get to the enjoyable part: Apply one layer of the chosen color, carefully getting the brush down to the cuticle and into the corners of your nails. A first coat that provides maximum coverage simplifies the second coat’s application. Just make sure the coating isn’t too thick.
Paint On a Second Layer Of Your Chosen Colour.
Applying the second layer of nail paint should be done after waiting two minutes. To get complete coverage that is also seamless, sheer or pastel tones may need a third layer. Just keep in mind that it should be nice and thin.
Complete The Process With a Topcoat
Do not omit the topcoat since it keeps your manicure from peeling and adds shine to your nails. If you do not apply a topcoat, you will dramatically reduce the time the paint job you have worked so hard on will last. A word of caution: while applying your topcoat, don’t make a mess since this might compromise the quality of your manicure.
File Down Any Uneven Edges, Then Allow Your Nails To Dry
Wrapping a piece of cotton ball that has been soaked in nail paint remover around the end of your cuticle stick and gently tracing around your nails is a great way to clean up any errors or shaky edges that may have occurred. If you have nail paint remover pads, you may get a more precise application by folding one into a triangle. After that, let your nails an extra five minutes to dry; it will be worth the wait when you show off your nails, and everyone is surprised to learn that you did them yourself.
Final Words!
If being as adorable as a button is more your style than anything else, you should experiment with some of the cutest nail art ideas. To make things easier for you, we have selected many attractive patterns from the list above. Now is the time to try these lovely manicure styles; you can anticipate receiving much praise.
Acquiring some simple nail art ideas and being able to execute them well are both excellent ways to create a fashion statement. You may show off your sense of fashion with any of the nail designs that were shown before. Whether interested in flowery pink nail art or color splash nail art, you may always give these designs a go.
You will be able to get the ideal appearance by following the detailed instructions that are provided underneath each design. If you want to give your nails a makeover or celebrate a particular event, try one of the nail art ideas discussed above. You may also experiment with other color combinations to find one that works well with your outfit!